
- Book Reviews THE WOMEN IN WHITE by Sarah Pekken
- Book Reviews THE SHADOWS TOMORROW by Noelle Michel
- Book Reviews THE SEASON OF LIGHT AND DARKNESS by Jillian Cantor
- Book Reviews THE HEART TRIALS by J. Elle
- Book Reviews GOOD GIRLS DIE BORED by Elizabeth Little
- Book Reviews THIS CHANGES EVERYTHING by Lisa Scottoline
- Book Reviews MAIN CHARACTERS by Bobby Palmer
- Book Reviews MCKENNA’S GUY by Mike Lawson
- Book Reviews THE DAHLIA SUITE by Carinn Jade
- Book Reviews LITTLE WONDER by Sophie Chen Keller
Digging Deep into Your Demographics with Quantcast


You know your blog’s page views, your bounce rate and your unique visitor stats*, so why do you need to know your blog’s demographics? Well, there is the curiosity factor of wanting to know what type of reader your blog is attracting, of course. However, what is more is important is what the demographic data tells you about your readers and how can you use it to improve your blog.
Where to get demographic data
The best source to get the skinny on your blog’s demographics, is at Quantcast.com with their free Quantcast Publisher program. This easy-to-use service gives you stats on traffic, website rank, and reader demographics like age, gender, children per household, income level, college graduate status, and so on.
Quantcast allows you to download your traffic statistics into an Excel (.xls) file. You can access this data by logging into your account, navigating to your Quantcast profile, clicking the Traffic’ tab and selecting Download traffic stats.
However, they do not support a download of demographic data. Instead, you can use the embed key to post your stats page on your About, Advertising, or PR Yes page like Wendy Piersall does at Woo! Jr. (If the code messes up your blog, take a screen shot and post the graphic file instead. Since it won’t update itself, you’ll have to do that manually from time to time.)
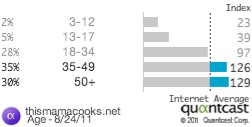
Or you can drill down further into your stats to highlight some of your blogs’ demographic strengths. Here is an example from one of my personal blogs, This Mama Cooks! Reviews:
Age
Benefits to you
If you are asked by a potential advertiser about your readers, you can provide them with detailed, easy-to-read audience profiles. They can see if your blog attracts more women then men, what their education levels are, and what their household income is.
In fact, potential advertisers and PR firms that want to work with you are probably looking at your Quantcast data even if you haven’t registered with them. Quantcast recommends that your join their free Quantcast Publisher program in order to get more accurate traffic statistics as well as gain control over what data you make visible to the public, and which you use for internal purposes only.
Becoming a better blogger with Quantcast stats
On your Quantcast dashboard, there’s a section under lifestyle called “Audience Also Likes.” This data gives you an intuitive sense of what your audience is into. If they are interested in parenting or home décor, write more posts on those topics.
If you have middle age readers like my blog, This Mama Cooks! Reviews (see above), maybe I should do more reviews of health and wellness products used by older people such as supplements for arthritis.
Another funny stat is businesses. Much to my surprise, you can use it to see what larger PR firms or companies are reading your blog.
Finally, there is the Business Activity stat – are people reading you from home or work? If you have many readers who view you from work, make sure to publish your posts during business hours Monday through Friday.
Remember, Quantcast is just another tool in your blogging tool box. Use it to your advantage to spark new ideas, but don’t get obsessed and spend hours pouring over your stats.
How to add Quantcast to a Blogger/Blogspot blog
- Create a Quantcast account at http://www.quantcast.com/user/signup and click Generate Tag in the Network & Settings section of your account.
- Login to your Blogspot dashboard and click on the Manage: Layout link.
- Select the Page Elements tab. Then select the Add a Page Element tab.
- Click on Add to Blog under HTML/Javascript. This will open a pop-up window where you can paste in your Quantcast tag.
- Return to your Quantcast account and click on the Scan a New Site button in the Network & Settings part of your account to register your site with Quantcast and start the Quantification process.
How to add Quantcast to a WordPress (self-hosted) blog
The easiest way to become Quantified is to place your Quantcast tag in a common file that is loaded on every page.
- Create a Quantcast account at http://www.quantcast.com/user/signup and click Generate Tag in the Network & Settings section of your account.
- Go to your Themes folder and locate either the footer.php or index.php file.
- Then open the file on your computer, add your Quantcast code at the bottom of the file, and re-save the file to your web-host.
- Return to your Quantcast account and click on the Scan a New Site button in the Network & Settings part of your account to register your site with Quantcast and start the Quantification process.
How to add Quantcast to a TypePad blog
- Create a Quantcast account at http://www.quantcast.com/user/signup and click Generate Tag in the Network & Settings section of your account.
- Login to your TypePad dashboard and go to Library then Typelists.
- Go to Add a Typelist and pick the type as Notes.
- The List Name can be something like <!—Quantcast code—>. (It’s <! dash dash TITLE dash dash> no spaces. Putting the code around the title makes it invisible to your readers.
- Click on Create New Typelist.
- Click on Add and paste the Quantcast code into Notes and save.
- Then go to publish and post it to your blog. Keep the Typelist at the bottom. Even though the code is invisible, it will add a bit of space.
*If you have any questions, let us know by leaving a comment. (And please don’t be shy!)
Anne-Marie Nichols is the Social Media Manager at Mom Central Consulting. You can also find her blogging up some healthy recipes at This Mama Cooks!
-
 THE WOMEN IN WHITE by Sarah Pekken
-
 THE SHADOWS TOMORROW by Noelle Michel
-
 THE SEASON OF LIGHT AND DARKNESS by Jillian Cantor
-
 THE HEART TRIALS by J. Elle
-
 GOOD GIRLS DIE BORED by Elizabeth Little
-
 THIS CHANGES EVERYTHING by Lisa Scottoline